How to Fit Acoustic Wall Panels for Soundproofing (UK DIY Guide)
Struggling with echo, noise, or poor room acoustics? This comprehensive UK DIY guide covers everything you need to know about how to fit acoustic wall panels, including panel types, fixing methods, room-by-room advice, top UK brands, and expert tips for a professional result.
Soundproofing is no longer reserved for recording studios. Thousands of homeowners across Britain are now turning to acoustic treatment to create calmer, quieter living and working spaces. The good news? Fitting acoustic wall panels is entirely achievable as a weekend DIY project, and with the right know-how, the results can be both impressive and long-lasting.
What Are Acoustic Wall Panels?
Acoustic wall panels are specially engineered sound-absorbing boards mounted directly onto walls or ceilings to reduce echo, reverberation, and noise transmission within a room. Unlike heavy-duty structural soundproofing, acoustic panels work primarily by absorbing sound waves before they can bounce off hard surfaces and create unwanted noise build-up.
They are commonly made from materials such as:
It is important to understand the distinction between sound absorption and sound blocking. Acoustic wall panels excel at absorption, which reduces echo and improves the acoustic quality within a room. If your goal is to prevent sound from travelling between rooms entirely, you will typically need a combination of acoustic panels alongside additional insulation, resilient channels, or mass-added wall constructions.
Why Fit Acoustic Wall Panels? Key Benefits for UK Homes
The popularity of Acoustic Wall Panels in UK homes has surged dramatically in recent years, and it is easy to see why. Here are the most compelling reasons to consider fitting them in your property:
- Improved speech clarity and listening comfort in home offices, living rooms, and bedrooms
- Reduced echo and reverberation in hard-surfaced rooms with wooden floors, large windows, or bare plaster walls
- Better privacy between rooms, reducing the transfer of conversation and music
- Enhanced performance in home cinemas, gaming rooms, music studios, and podcast recording setups
- Stylish interior aesthetic as modern panels are available in a wide range of colours, textures, and finishes
- Increased property value, particularly for properties marketed to remote workers and creative professionals
- Compliance with UK building regulations in new builds or refurbishments where Part E acoustic standards apply
Types of Acoustic Wall Panels: Choosing the Right One
| Panel Type | Best For | Typical NRC Rating | DIY Friendly? |
|---|---|---|---|
| Fabric-wrapped mineral wool | Home studios, offices, meeting rooms | 0.80 to 1.00 | Yes, with adhesive or Z-clips |
| PET polyester foam tiles | Bedrooms, gaming rooms, children’s playrooms | 0.55 to 0.85 | Very easy, peel and stick options available |
| Timber slat acoustic panels | Living rooms, home cinemas, feature walls | 0.60 to 0.80 | Moderate, requires accurate measuring and cutting |
| Perforated MDF panels | Commercial spaces, home offices | 0.65 to 0.90 | Moderate, best with a second pair of hands |
| Mass-loaded vinyl composites | Party walls, floors, ceilings | Blocking rather than absorption | Moderate to advanced |
Tools and Materials You Will Need
Before you begin, gather everything you need so the job runs smoothly from start to finish. Here is your complete checklist:
Essential Tools
- Tape measure and steel ruler
- Spirit level (at least 600mm long for larger panels)
- Pencil for marking wall positions
- Power drill with masonry and wood drill bits
- Screwdriver (flathead and Phillips)
- Wall stud finder (especially important for plasterboard walls)
- Utility knife or panel saw for trimming panels
- Notched adhesive trowel (if using panel adhesive)
- Hammer and wall plugs
- Paint roller tray and brush if painting surrounding areas first
Materials and Fixings
- Your chosen acoustic wall panels (measured accurately to your room)
- Heavy-duty construction adhesive such as Gripfill, No More Nails, or Soudal Fix All Flexi
- Z-clips or panel clips (for removable installations)
- Wall plugs and screws (Red Rawlplug for masonry, suitable gauge for timber studs)
- Timber battens or a metal frame system (for suspended installations)
- Acoustic sealant for filling gaps around panel edges
- Decorator’s caulk for a neat finish around borders
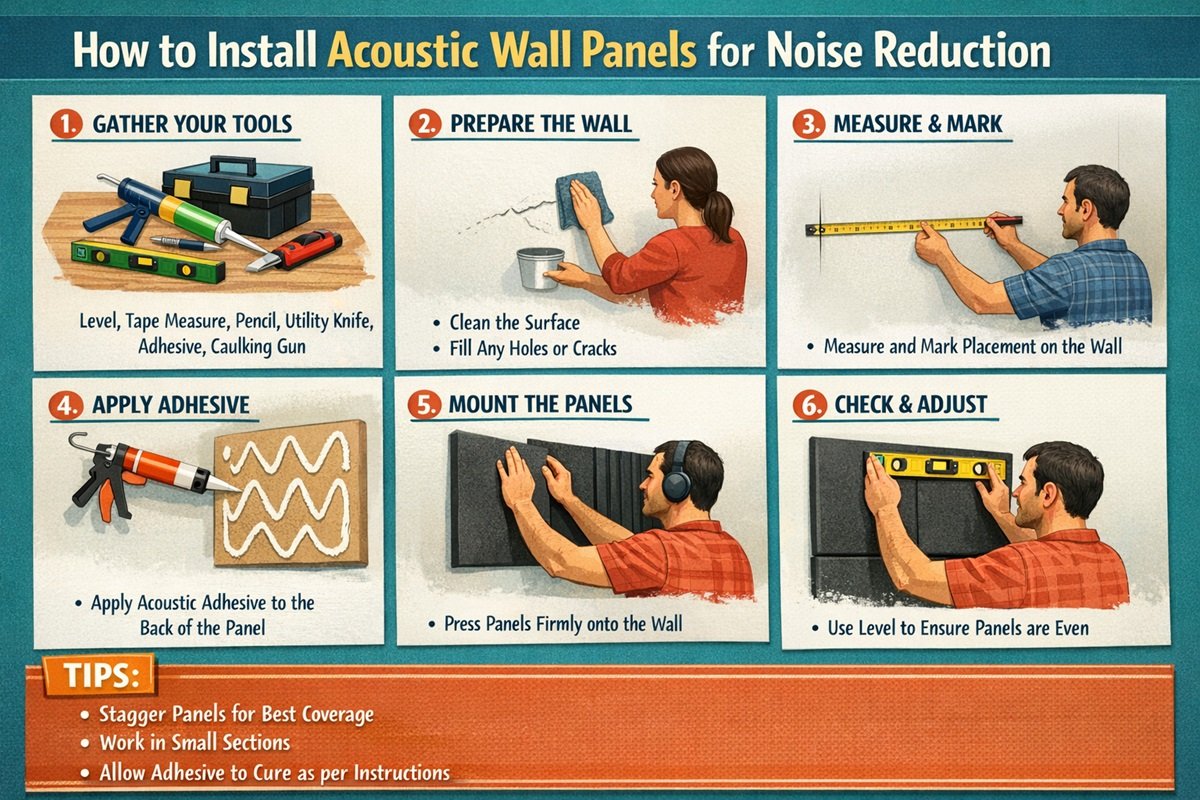
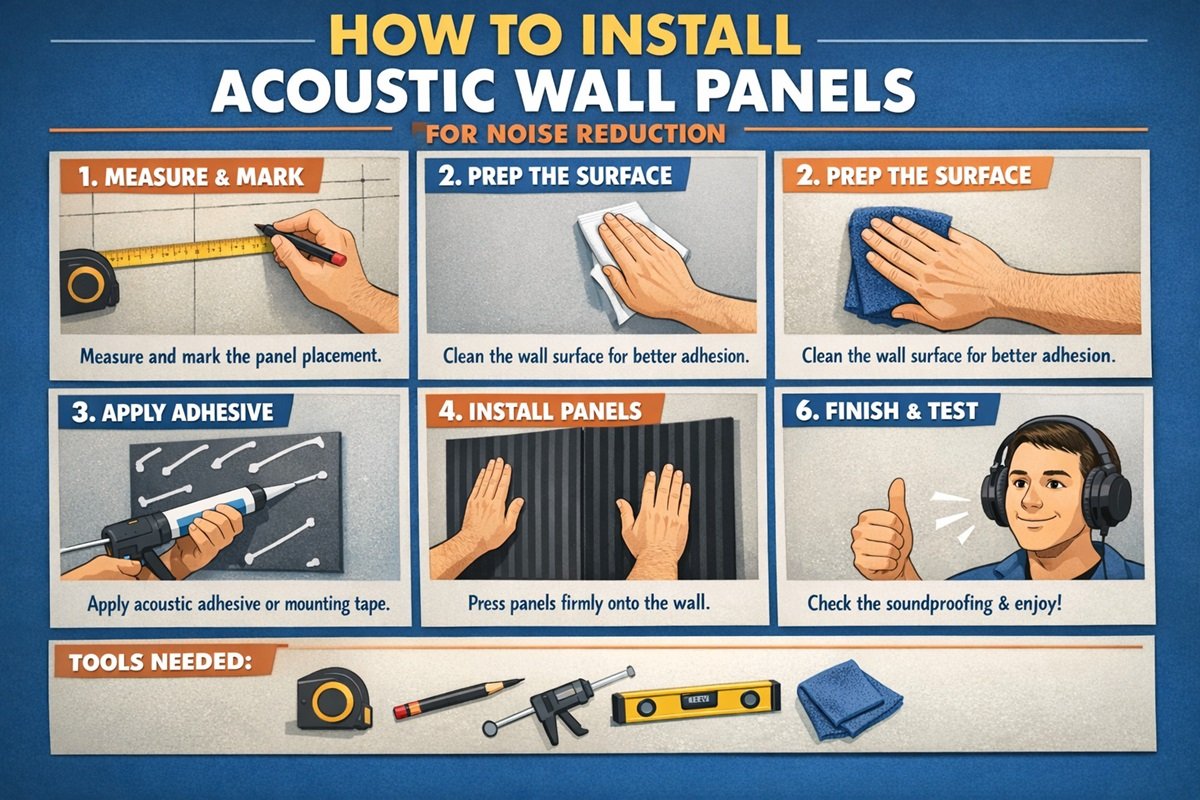
How to Fit Acoustic Wall Panels: Step-by-Step UK DIY Guide
Follow these steps carefully for a professional, long-lasting result. This guide covers the most common installation method: direct adhesive fixing combined with mechanical fixings, suitable for the vast majority of UK wall types including solid brick, block, and plasterboard stud walls.
Plan Your Layout and Calculate Coverage
Start by deciding how much of the wall (or walls) you want to cover. For good acoustic treatment, aim to cover at least 25 to 30 percent of the total wall surface area in the room. For a home studio or podcast room, you may want to cover 40 to 60 percent or more.
Sketch the wall to scale on paper or use a free room planning tool. Mark out where panels will sit, accounting for sockets, light switches, radiators, and window reveals. This avoids costly cutting mistakes later.
Prepare the Wall Surface
A clean, dry, and stable surface is essential for a successful installation. Remove any loose wallpaper, flaking paint, or dust. Fill any cracks or holes with filler and allow it to dry fully before proceeding. If the wall has a glossy painted surface, lightly sand it to help the adhesive bond properly. For older properties with damp issues, address the underlying damp problem before fitting any acoustic panels.
Mark Your Panel Positions on the Wall
Using your tape measure and spirit level, mark out the exact position of each panel on the wall with a pencil. Always use a spirit level to ensure your panels are perfectly horizontal or vertical. An off-level panel will be very obvious once fitted and is difficult to correct without removing the panel entirely. Work from the centre of the wall outwards for a symmetrical, balanced look.
Choose Your Fixing Method
The correct fixing method depends on your panel type and wall construction. The three most common approaches in UK homes are:
Fix the Panels to the Wall
With your chosen method prepared, carefully position each panel against the wall following your pencil markings. If using adhesive, work quickly as most construction adhesives begin to grab within a few minutes. Press firmly across the entire panel surface to ensure good contact. If drilling into masonry walls, use the correct size wall plug for your screw gauge. For plasterboard stud walls, always try to hit a timber stud where possible for a secure fixing. Use a stud finder beforehand to locate these accurately.
Fill Gaps and Finish the Edges
Once all panels are secured, inspect the edges carefully. Any gaps between panels, or between panels and adjoining walls, should be filled with acoustic sealant or decorator’s caulk for a clean, professional finish. Acoustic sealant also helps to prevent sound leaking through any small gaps at the panel perimeter. Run a bead along each edge, smooth with a damp finger, and allow to fully cure before painting over if required.
Test the Acoustic Improvement
Once your installation is complete and the adhesive has fully cured (usually 24 to 48 hours), carry out a simple listening test. Clap your hands sharply in the room and listen for the decay of the sound. You should notice a noticeably shorter, more controlled reverb tail compared to before installation. Free apps such as REW (Room EQ Wizard) can also provide an objective before-and-after measurement of your room’s reverberation time (RT60).
Room-by-Room Acoustic Panel Guide for UK Homes
Home Office and Study
A home office benefits enormously from acoustic treatment, particularly if you are on regular video calls. Fit panels to the wall directly behind and to the sides of your monitor. Fabric-wrapped mineral wool panels in neutral tones are ideal here, blending in with a professional backdrop whilst improving speech intelligibility significantly.
Bedroom
In the bedroom, the goal is usually to reduce echo for a calmer sleeping environment and to limit sound transfer from adjacent rooms. PET polyester tiles are a popular choice here as they are lightweight, available in soft neutral colours, and can be fitted without heavy drilling. Position panels on the wall behind the headboard and on the wall facing the largest window for maximum effect.
Home Cinema and Living Room
Timber slat acoustic panels have become a statement design feature in UK living rooms and home cinema setups. A large format slat panel fitted to the wall behind your television or projector screen dramatically reduces screen bounce and flutter echo, creating an immersive, cinema-quality listening experience. Combine with a thick rug and heavy curtains for a complete acoustic treatment package.
Music Room and Home Studio
Music rooms require the most comprehensive acoustic treatment. Consider covering the majority of wall surfaces with a combination of thick absorption panels (at least 75mm to 100mm deep) and diffusion panels. Place absorption panels in the reflection points to the left, right, and above the listening position. Add bass traps in all four corners of the room to manage low-frequency build-up, which is the most common problem in home studios.
Kitchen and Utility Room
Hard kitchen surfaces can create a surprisingly noisy environment. Splash-back style Kitchen Wall Panels with acoustic backing, or slim foam acoustic tiles fitted to the ceiling above a dining area, can make a real difference to the ambience during family meals and gatherings. Look for panels rated for food-safe environments if fitting close to cooking areas.
Recommended Acoustic Wall Panel Brands Available in the UK
Widely available in the UK, offering fabric-wrapped absorbers, cloud panels, and portable acoustic screens. Excellent NRC ratings and a broad range of fabric colours.
A premium Portuguese brand stocked by UK pro audio retailers. Renowned for their FlexiBass range of corner bass traps and Wavewood diffusion panels used in professional studios.
New Zealand-originated brand with strong UK distribution. Their Cube and Groove tile systems are popular for contemporary office and residential interiors.
Specialists in acoustic curtain track systems that complement wall panels, widely used in UK hotels and high-end residential projects.
UK-based supplier of mass-loaded vinyl and composite soundproofing products, often used alongside acoustic panels in party wall treatments.
An accessible entry-level option for DIYers, available via Amazon UK. PET foam acoustic panels at competitive price points with good customer reviews.
Common Mistakes to Avoid When Fitting Acoustic Panels
UK Building Regulations and Acoustic Standards
If you are fitting acoustic panels as part of a larger home renovation or conversion project, you should be aware of Approved Document E (Part E) of the Building Regulations for England and Wales, which sets minimum standards for sound insulation between dwellings.
Key points for UK homeowners:
- Part E applies to new-build properties and material changes of use, such as converting a house into flats
- It does not typically apply to straightforward DIY acoustic treatment within an existing single dwelling
- If you are constructing a dedicated music room or studio in a shared or semi-detached property, consider seeking advice from an acoustic consultant to avoid future disputes with neighbours
- Scotland, Northern Ireland, and Wales each have slightly different acoustic standards within their respective building regulations
- Properties in conservation areas or listed buildings may require permission before making structural acoustic modifications
Frequently Asked Questions About Fitting Acoustic Wall Panels
Conclusion: Transform Your Space with Acoustic Wall Panels
Fitting acoustic wall panels is one of the most impactful improvements you can make to a room in your UK home. Whether you are creating a calm home office, a professional recording space, or simply looking to reduce the echo in a busy family living room, the process is well within the capabilities of a motivated DIYer with the right tools and preparation.
The key is to plan carefully, choose the right panel type for your specific acoustic challenge, and use appropriate fixings for your wall type. Avoid the common pitfall of under-treating the space and remember that targeting the correct frequency range for your problem will determine whether your results are good or truly excellent.
From premium brands like Vicoustic and Autex to accessible options on Amazon UK, there has never been a better selection of acoustic wall panels available to British homeowners. Take your time, measure twice, and enjoy the satisfaction of a quieter, more controlled acoustic environment that you built yourself.
Ready to get started? Gather your tools, measure your walls, and take the first step towards a noticeably quieter, more comfortable home.